MariaDBは、MySQLから派生したオープンソースのリレーショナルデータベース管理システム(RDBMS)です。
本稿ではLinuxのUbuntu 24.04環境で、MariaDBの導入と基本操作について、詳しく説明します。

インストールしよう
公式のリポジトリから次のコマンドを実行します。
$ sudo apt install mariadb-server mariadb-client
パッケージリストを読み込んでいます... 完了
依存関係ツリーを作成しています... 完了
状態情報を読み取っています... 完了
以下の追加パッケージがインストールされます:

~ <省略>
MariaDBのバージョンを確認します。
プロンプトが表示されたら exit と入力します。
$ sudo mysql -v
Welcome to the MariaDB monitor.  Commands end with ; or \g.
Your MariaDB connection id is 32
Server version: 10.11.8-MariaDB-0ubuntu0.24.04.1 Ubuntu 24.04

Copyright (c) 2000, 2018, Oracle, MariaDB Corporation Ab and others.

Reading history-file /root/.mysql_history
Type 'help;' or '\h' for help. Type '\c' to clear the current input statement.

MariaDB [(none)]> exit
Writing history-file /root/.mysql_history
Bye
DBを設定しよう
文字セットを指定します。
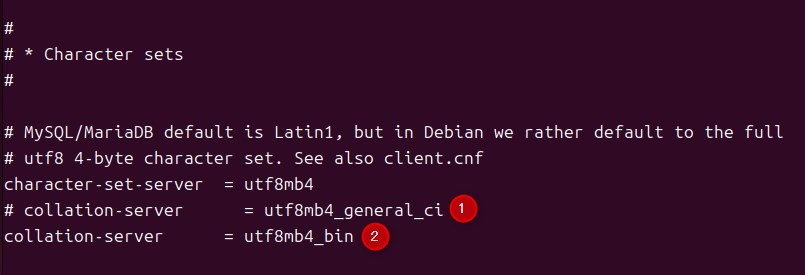
/etc/mysql/mariadb.conf.d/50-server.cnf をエディタで編集します。
下の①の行をコメントアウトし、②の行を追加します。

セキュリティに関する設定を行います。
所々で入力を促されます。筆者は以下のように入力しました。
 sudo mysql_secure_installation
[sudo] lin のパスワード:

~ <省略>

Enter current password for root (enter for none):  ← [Enter]
OK, successfully used password, moving on...

~ <省略>

Switch to unix_socket authentication [Y/n] Y
Enabled successfully!
Reloading privilege tables..
 ... Success!

~ <省略>

Change the root password? [Y/n] Y
New password:  ← MariaDBの管理者の「新」パスワードを入力
Re-enter new password:  ← パスワードを再入力
Password updated successfully!
Reloading privilege tables..
 ... Success!

~ <省略>

Remove anonymous users? [Y/n] Y
 ... Success!

~ <省略>

Disallow root login remotely? [Y/n] Y
 ... Success!

~ <省略>

Remove test database and access to it? [Y/n] Y
 - Dropping test database...
 ... Success!
 - Removing privileges on test database...
 ... Success!

Reloading the privilege tables will ensure that all changes made so far
will take effect immediately.

Reload privilege tables now? [Y/n] Y
 ... Success!

Cleaning up...

All done!  If you've completed all of the above steps, your MariaDB
installation should now be secure.

Thanks for using MariaDB!
MariaDBであそんでみよう
MariaDBの管理者(root)にログインします。パスワードはLinux側のパスワードを最初に入力し、次にMariaDBのrootのパスワードを入力します。
$ sudo mysql -u root -p
[sudo] lin のパスワード:  ← Linuxのパスワード
Enter password:  ← MariaDBの管理者のパスワード
Welcome to the MariaDB monitor.  Commands end with ; or \g.
Your MariaDB connection id is 43
Server version: 10.11.8-MariaDB-0ubuntu0.24.04.1 Ubuntu 24.04

Copyright (c) 2000, 2018, Oracle, MariaDB Corporation Ab and others.

Type 'help;' or '\h' for help. Type '\c' to clear the current input statement.

MariaDB [(none)]>
「tmpdb」というデータベース(DB)を作成します。
MariaDB [mysql]> create database tmpdb;
Query OK, 1 row affected (0.000 sec)
新たにDBユーザを作成します。ユーザ名を「seshat」、パスワードを「password」としました。この部分は任意のユーザ名とパスワードに変更ください。
続いてseshatがtmpdbにアクセスできるようにします。
最後に exit で終了します。
MariaDB [tmpdb]> create user 'seshat'@'localhost' identified by 'password'
    -> ;
Query OK, 0 rows affected (0.001 sec)

MariaDB [tmpdb]> grant all on tmpdb.* to 'seshat'@'localhost';
Query OK, 0 rows affected (0.002 sec)

MariaDB [tmpdb]> exit;
Bye
今度は seshat ユーザでDBにログインしてみます。
$ mysql -u seshat -p ← 上で作成したDBのユーザ名
Enter password:  ← 上で作成したDBのユーザ名に対するパスワード

~ <省略>

MariaDB [(none)]>
プロンプトが表示されたら、ログイン成功です。
続けて tmpdb にテーブルを作成します。no という整数のカラムを持つテーブルです。
MariaDB [(none)]> use tmpdb;
Database changed
MariaDB [tmpdb]> create table tbl01 (no int);
Query OK, 0 rows affected (0.007 sec)
DBオブジェクトの定義情報を表示します。
ariaDB [tmpdb]> desc tbl01;
+-------+---------+------+-----+---------+-------+
| Field | Type    | Null | Key | Default | Extra |
+-------+---------+------+-----+---------+-------+
| no    | int(11) | YES  |     | NULL    |       |
+-------+---------+------+-----+---------+-------+
1 row in set (0.001 sec)
ここからいろいろな方法で、noカラムに整数値を格納したレコードを作成します。
ariaDB [tmpdb]> insert into tbl01 (no) values (1);
Query OK, 1 row affected (0.005 sec)

MariaDB [tmpdb]> insert into tbl01 (no) values (2),(3);
Query OK, 2 rows affected (0.001 sec)
Records: 2  Duplicates: 0  Warnings: 0

MariaDB [tmpdb]> insert tbl01 set no=4;
Query OK, 1 row affected (0.001 sec)
上は、noに1から4までを格納したレコードを作成したところです。
MariaDB [tmpdb]> update tbl01 set no=400 where no=4;
Query OK, 1 row affected (0.001 sec)
Rows matched: 1  Changed: 1  Warnings: 0

MariaDB [tmpdb]> select * from tbl01;
+------+
| no   |
+------+
|    1 |
|    2 |
|    3 |
|  400 |
+------+
4 rows in set (0.000 sec)
上は、noが4のレコードを400に変更し、tbl01のレコードをすべて表示したところです。
MariaDB [tmpdb]> delete from tbl01 where no>100;
Query OK, 1 row affected (0.002 sec)

MariaDB [tmpdb]> select * from tbl01;
+------+
| no   |
+------+
|    1 |
|    2 |
|    3 |
+------+
3 rows in set (0.001 sec)
さらにnoが100より大きいレコードを削除しました。結果としてnoが400のレコードが削除されました。
さいごに
MariaDBは、MySQLの機能を強化しつつ、オープンソースの利点を活かしたデータベースとして、多くの企業や開発者に支持されています。
本記事をきっかけに、MariaDBに興味を持っていただけると幸いです。

